I always wanted to have all types of the U.S. Navy's flight deck tractors in the 1:72 scale so as to be able to compliment every type of the U.S. carrier aircraft model with a contemporary little tractor. And although my diorama projects are not complete yet, the subject of flight deck tractor models is now resolved for me. This article covers my models of all types of flight deck tractors that served on the U.S. Navy aircraft carriers.
I. Willys MB Flight Deck Tractor
1. Introduction
Basic information on the Willys MB ¼ ton 4x4 utility truck is available in Wikipedia (link) and will not be repeated here. However, not everyone knows that in addition to widespread use by the Army and the Air Force the ubiquitous jeep has also served on aircraft carriers.
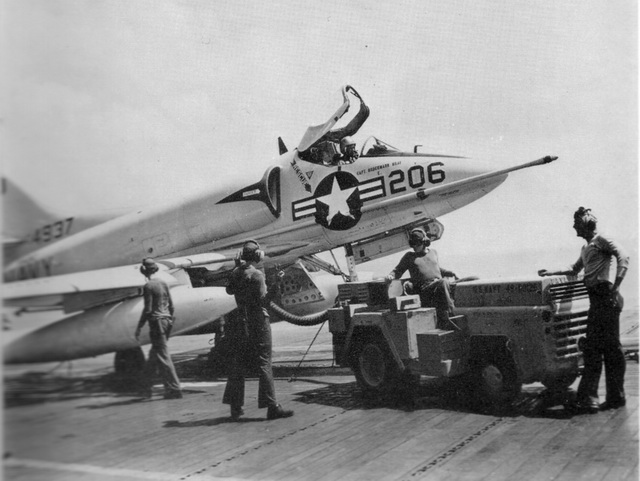
Willys MB jeeps appeared on U.S. Navy carrier decks in mid 1942. At this time Grumman Avenger torpedo-bomber was entering squadron service and it was much heavier than the mainstays of early wartime air groups, F4F Wildcat fighters and SBD Dauntless dive bombers. Thus the long established practice of manhandling aircraft around the deck began to negatively affect the efficiency of flight operations, which already increased dramatically when compared to the pre-war years and the first months of war. The logical choice was to have aircraft towed by tractor tugs, and Willys MB jeeps, together with Ford and Clark tractors, were acquired to serve in this role. Thus the Willys jeeps have faithfully served as aircraft tractors on fleet carriers (Yorktown and Essex classes) as well as on smaller ships (Independence, Bogue, Sangamon, Casablanca classes) till the end of the war. Afterwards, most shipboard jeeps were retired. For a short period of time some were retained for use as aircraft starters until replaced by purpose-built NC-1A vehicles in the early 1950s.
2. Kit
A number of Willys MB kits are available in the 1:72 scale. There are older models from Hasegawa, Academy and Italery, as well as more modern ones offered by Airfix (re-packed by Heller) and S-Model.
As I lack the S-Model's kit, my brief comparison will only focus on the differences between the newer Airfix / Heller sets (catalogue numbers 01322 and 79997 respectively) and the ageing Hasegawa / Academy offerings.
In my view, the Airfix / Heller's item will represent a real Willys quite accurately even when built straight out of the box. First of all, the wheels and the radiator grille – both very distinctive features of this legendary vehicle – are way more accurate compared to what we see in older kits. Then, considerably more interior and chassis details are present, although these are still too thick and rough for the scale. On the down side, the axe-and-shovel toolkit is molded together with the bodywork, and the grille is marred by a round badge intended for data on the vehicle weight and bridge class (not applicable for the USN vehicles).
For the purpose of comparison I enclose photographs of Airfix (olive in color) and Hasegawa (light grey) kit parts.


3. Construction
When building my model, I made the following improvements and changes to the Airfix kit:
- Details molded together with the jeep's body (braces, toolkit, etc.) removed.
- Instead, the following detailing scratch-built and added: spare wheel and jerrycan empty holders, hood locks, steering wheel, gearbox levers, pedals.
- Scratch-built detailing added to the chassis, including shock absorbers, leaf springs, exhaust system and the engine block.
- Clear headlights with foil reflectors (from an aftermarket set by Elf) installed.
- Photoetched metal radiator grille, custom-designed and manufactured, used in place of the respective plastic part.
4. Painting & Markings
Color historical photographs confirm the existence of Olive Drab (FS34087), Ocean Grey (FS36187) and Sea Blue (FS15042) painted Jeeps on carrier decks during the war years. In that period overall Ocean Grey was the standard color, while Olive Drab and Sea Blue were exceptions, not the rule. After the war most carrier deck vehicles, including the remaining Willys jeeps, were repainted with Orange Yellow (FS33538).
It appears that the jeeps did not receive any standardized markings while in service on carriers. There is a couple of photos where jeeps carry "U.S.N. *****" legend on the hood; but on a majority of historical photographs carrier-based jeeps do not have any markings whatsoever.
My model is painted Ocean Grey FS36187 overall so as to represent a most typical wartime case.
5. Reference Data
[1] The U.S. Army Jeep at War | S.J.Zaloga | Concord Publications, 2009
[2] A selection of photo walk-arounds: link
[3] An article on the history of the U.S. Navy's flight deck tractors | Military Aircraft Monthly magazine, May 2010 issue, pages 68-70
[4] Some historical photographs that show carrier deck Willys jeeps in various colors: link, link, link, link, link.
II. Clarktor 6 Flight Deck Tractor
1. Introduction
Same as with Willys jeeps, the U.S. Navy started to use Clark tractors on its aircraft carriers in the first wartime years. Clarktor 6 tractors, which by that time has already been in service on the U.S. Army Air Force airfields, helped to tow and position aircraft on the carriers' busy flight decks and saw success in this role. Replaced by newer flight deck tractors in the mid 1950s, Clarktors continued to serve on some Naval Air Stations until the late 1960s.
2. Kit
Clarktor 6 tractor model in the 1:72 scale is available from Academy and VideoAviation. My model comes from the Academy's set ("U.S. Ambulance & Tow Truck", catalogue # 13403) which also includes a Dodge WC54 ambulance and a rather generic bomb cart. The plastic is good, but the tractor's parts are a bit crude and lack fine detailing. To build an accurate model one will have to replace the wheels and to correct the shape of the front grille, rear fenders, hood and dashboard. An aftermarket photoetched detail set by Eduard (catalogue # 22111) is available for this kit. Most photoetched parts are there to detail the Dodge ambulance; those intended for the tractor are few and not particularly accurate, especially the front grille and the dashboard.


3. Construction
My Clarktor model from the Academy's set was subject to the following improvements:
- The tractor's body was corrected to accommodate twin rear wheels (as seen on most USN Clarktors); this included modifying the rear wheel wells and fenders.
- The kit's wheels do not even remotely resemble the real thing. Therefore new front and rear wheels were made using some aircraft wheels from a box of spares.
- New front grille was made, as neither the kit's original one nor the one from a photoetched detail set made by Eduard are accurate.
- Dashboard and engine cowling's side panels were made from scratch. Again, neither the kit's original dashboard nor the one offered by Eduard is accurate.
- Finally, I have added clear headlights with metal foil reflectors.


4. Painting & Markings
Wartime flight deck Clarktors were painted overall Ocean Grey (FS36187). After the war they were repainted with Orange Yellow (FS33538). It appears that Clark tractors did not receive any standardized markings while in service on carriers. There are some photos where they carry "U.S.N. 11-*****" legend on the hood; but on most historical photographs carrier-based Clarks do not carry any identification numbers. However, many carry black diagonal stripes on the radiator grille.
My model is painted Orange Yellow to represent a post-war flight deck tractor.
5. Reference Data
[1] A photo walk-around (relevant pictures are numbered 1, 2, 3 and 13 through 16): link
[2] A number of pictures on this page show Clark tractors in service on the USS Coral Sea: link
III. Ford BNO-40 Flight Deck Tractor
1. Introduction
This type of flight deck tractor, known as Ford BNO-40 or – when in civilian use– as Ford Ferguson 9N, has entered service with the U.S. Navy in the first wartime years. These ubiquitous vehicles served on most USN carriers, including USS Enterprise (CV-6), Essex and Midway class attack carriers, Independence class light carriers and even the smaller Bogue, Sangamon, Casablanca and Commencement Bay class escort ships. After seeing through both the World War II and the Korean war they were replaced on U.S. carriers by newer tractors in the mid 1950s, while some went to work for the French Navy on the decks of R96 La Fayette (ex USS Langley) and R97 Bois Belleau (ex USS Belleau Wood).
2. Kit
Ford BNO-40 flight deck tractor model kit in the 1:72 scale is available from F4Models (catalogue # 7007). The kit includes resin and photoetched parts. Driver's position and engine compartment are nicely detailed.
3. Construction
I have built my kit straight out-of-the-box. One must take care when bending the photoetched metal radiator grille and rear fenders so as to avoid making sharp edges.


4. Painting & Markings
Same as with Clark tractors mentioned above, wartime carrier deck Ford tractors had Ocean Grey paint jobs. After the war, some were repainted with Orange Yellow, but some retained their original Ocean Grey paint. Many had black & yellow diagonal stripes on their front panels and radiator grilles. Some carried "BNO-40-****" or "U.S.N. 11-*****" serial numbers on the hood. Many had large single- or double-digit identification numbers painted on front panels and rear fenders.
My model is painted Ocean Grey to represent a wartime flight deck tractor.
5. Reference Data
[1] Technical data and some walk-around photos of a restored Ford Ferguson 9N on Estrella WarBirds Museum's site: link
[2] Some historical photographs that show Ford tractors in action on flight decks: link, link, link.
IV. MD-1 Flight Deck Tractor
1. Introduction
In the 1950s, to keep pace with growing weight of modern carrier jets, the U.S. Navy faced a need to replace its aging fleet of Ford and Clark flight deck tractors in use since the World War II. The new tractor for the Navy, the MD-1, has entered service in the mid 1950s. Apart from aircraft towing and positioning, MD-1s were employed to start up aircraft jet engines. For this purpose many were fitted with jet turbine start units mounted on the platform in the rear. MD-1 tractors served on Essex / Oriskany class, Midway class and Forrestal / Kitty Hawk class carriers of the U.S. Navy until the mid 1960s. They have also been employed on the Royal Canadian Navy's HMCS Bonaventure and on the Brazilian Navy's Minas Gerais carriers.
2. Kit
MD-1 flight deck tractor model kit in the 1:72 scale is available from F4Models (catalogue # 7001). The kit contains resin and photo etched parts that allow for at several different options (with or without starter unit; different front grille; arrangement of ballast weights).


3. Construction
My model of the MD-1 is very close to an out-of-the-box build. I have added a couple of hand braces scratch-built from thin wire, and also an air hose that is used to start aircraft jet engines. Headlamps are made from small bowl-shaped pieces of metal foil filled with clear varnish.


4. Painting & Markings
All U.S. Navy MD-1s were overall Orange Yellow (FS33538). Many had their front and rear panels painted with black diagonal stripes. Most carried "USN 49-*****" serial numbers on the hood. Some had large identification numbers, but their placement and appearance was not standardized, apparently.
5. Reference Data
[1] An article on the history of the U.S. Navy's flight deck tractors | Military Aircraft Monthly magazine, May 2010 issue, pages 68-70
[2] Some historical photographs that show MD-1 tractors in action on flight decks: link, link, link, link.
V. MD-3 Flight Deck Tractor
1. Introduction
The MD-3 tractor appeared on the flight decks of the U.S. Navy carriers in the early 1960s. Being probably the first U.S. purpose-built shipboard tractor, it was substantially larger and heavier than all its predecessors so as to cope with towing heavier aircraft, but at the same time it sported a very low profile in order to fit under the long sleek noses of modern aircraft. An interesting feature was the modular rear deck: different containers can be flush-mounted there, thus defining the vehicle's role. The jet aircraft start unit, housing a gas turbine air compressor, was the most common: nearly all MD-3s on carriers were equipped with one. A frame containing a compact fire fighting unit could also be employed. The vehicle proved to be a success and came to serve on all U.S. carriers (including Oriskany, Midway, Forrestal, Kitty Hawk, Enterprise and Nimitz classes) as well as on most helicopter carriers and assault ships. A small number of MD-3 flight deck tractors were also employed on the Royal Canadian Navy's HMCS Bonaventure and on the Argentine Navy's carrier Veinticinco de Mayo.
In the mid 1990s MD-3 tractors have been replaced on the U.S. Navy ships by a newer, updated version that bears the designation A/S32A-31A and differs from the original tractor in several aspects (see section VI below).
2. Kit
MD-3 models in the 1:72 scale can be obtained from either Fujimi, Verlinden or DreamModel. My kit comes from the Fujimi's "Flight Deck Crew & Carrier Tractor" set (catalogue # 35001) which also includes ten flight deck personnel figures. The set contains the early version of the tractor and provides three options: one can build a tractor with either a compressor or a firefighting unit attached, or have it in a plain "tractor only" configuration. The parts are well molded and provide good out-of-the-box detail. There are a number of accuracy issues, however:
1) The rear wheels on MD-3 tractors have twin tires, whereas the kit offers single tires.
2) The driver's compartment is too wide: it is 52% of the total width of the kit while on a real MD-3 it is just 36% of the total width.
3) In the kit, there is a projection under the driver's seat that is not confirmed by photographs of actual MD-3s.


3. Construction
My model was subject to the following improvements:
- I have the kit's rear single wheels replaced with twin ones; this process included making wider wheel wells in the tractor's body and getting additional tires by replicating the original ones through casting.
- Scratch-built hand braces, levers and pedals added, as well as clear headlights with metal foil reflectors.
- The compressor's air hose is also scratch-built, as the one supplied with the kit looks genuinely plastic.
- Tie-down chains and wheel chokes were added, as operational MD-3 photos show that various gear was frequently stored on the tractor's top deck.
I have not corrected the width of the driver's compartment on my model; therefore it is inaccurate, and I will be building another one some time in the future, keeping in mind all necessary corrections.


4. Painting & Markings
From the 1960s and up to the early 1990s all MD-3s serving as tow tractors were painted Orange Yellow (FS33538), a standard color for the Navy's support equipment at that time. Tractor bumpers were painted with diagonal black stripes, towing hooks were dull red and the special anti-skid coating on the tractor's top surface had a distinct asphalt-like color and texture. Most MD-3 tractors had large identification numbers painted on their sides, and sometimes on the top anti-skid surface as well. In the 1960s and 1970s most MD-3s carried "USN 49-*****" serial numbers on the hood. Later in their service life serial numbers were changed to "5MH***", and the tractors also received equipment code "GPC7" (same code for all MD-3s).
In the early 1990s a new paint scheme of overall Insignia White was introduced for shipboard support equipment. Shift to this new scheme was a gradual process, so both white and yellow MD-3s could be seen working side by side for some time. Simultaneously, the tractors received reflective stripes and a lot of small stenciling, including various warning and service notes (none of which are seen on MD-3 photos from the 1960s, 70s and 80s).
5. Reference Data
[1] An article on the history of the U.S. Navy's flight deck tractors | Military Aircraft Monthly magazine, May 2010 issue, pages 68-70
[2] A number of pictures on this page show old MD-3 tractors in service on the USS Coral Sea: link
VI. A/S32A-31A Flight Deck Tractor
1. Introduction
A/S32A-31A is a current flight deck tractor for all active U.S. Navy aircraft carriers and amphibious ships, including LHA, LHD, LSD, LPD and LPH classes. On carriers the vehicle is typically equipped with a gas turbine unit to start jet aircraft engines. Externally this new version of the tractor differs from the early MD-3s by wider rear fenders, slightly raised rear deck, different wheels and new starter unit.
The A/S-32A-31A flight deck tractor was in service on all U.S. Navy aircraft carriers and amphibious ships between the mid-1990s and mid-2010s, including Kitty Hawk, Enterprise and Nimitz class carriers as well as Whidbey Island, Harpers Ferry, Austin, Tarawa, Wasp and San Antonio class amphibious ships. On aircraft carriers this type of tractor is typically equipped with a gas turbine unit for starting jet aircraft engines. Externally the A/S-32A-31A differs from the older MD-3 (in use since the 1960s through the 1990s) by wider rear fenders, slightly raised rear deck, different wheels and gas turbine new start unit.
2. Kit
This 1:72 scale model kit representing the current A/S32A-31A tractor is from F4Models (catalogue # 7002). The kit contains resin and photo etched parts to assemble the tractor with options to choose between two variants of the starter unit – the older one from the 1990s and the newer one used in the 21st century. A folded air hose is a part of the kit and comes cast in resin.


3. Construction
This kit is not an easy build. Resin parts require some sanding to achieve correct fit, and photoetched parts are many and have to be handled with particular care. When building my kit, I added clear headlights with metal foil reflectors.
My model comes from a very early batch of F4Model's kits and has inaccurate driver compartment's width. The manufacturer has modified the kit since then, and all current # 7002 kits contain more accurate pats (as seen on the kit contents photograph above). 

4. Painting & Markings
All A/S32A-31A tractors are painted Insignia White (FS37875) with top anti-skid coating in various shades of grey. Bumpers are painted with diagonal black stripes, towing hooks are dull red and headlights are usually clear blue. Jet start unit exhaust is burnt steel, air hose is dull red or dark grey with black stiffener coil. Tractors carry yellow reflective stripes and a lot of small stenciling that includes warning and service notes. They also have "SGM***" or "TRC***"serial numbers and "GPCX" equipment codes painted on their sides (this code is the same for all A-31A model tractors).
5. Reference Data
[1] An excellent photo walk-around of a modern new A/S32A-31A: with link (go to Photography => Aircraft Carrier Ops => Flight Deck Equipment Part I).
[2] A collection of good in action photos: link (go to Walkarounds => Aircraft Carriers)
VII. A/S32A-32A Hangar Deck Tractor
1. Introduction
In the early 1960's the U.S. Navy ordered a purpose-built vehicle to tow, turn and position aircraft on hangar decks and elevators of its aircraft carriers. The new SD-2, known informally as "Spotting Dolly", was small and agile: it could fit under the fuselage of most aircraft and pivoted on a caster wheel with a zero turning radius. Its two hydraulically articulated arms pinned the aircraft nosewheel and allowed for precise positioning within the confines of hangars and elevators. In 1990's an updated version of the spotting dolly was introduced – the A/S32A-32A – that is still in use today on all U.S. carriers and large-deck amphibious ships.
When building a diorama, note that these tractors do not tow aircraft on the flight deck and do not normally venture onto the flight deck at all; they move airplanes and helicopters through the hangar, bring them to elevator platforms and then push them onto the flight deck, where they are taken over by flight deck tractors (such as the A/S32A-31A tractor).
2. Kit
The kit representing the A/S32A-32A variant of the tractor came from F4Models (cat. # FM7004) and contained resin and photo etched parts.
My model is mostly an out-of-the-box build. I have added metal wire pieces to model various hydraulic lines and the axle that moves the towing arms. For headlights, I made reflectors from metal foil.
4. Painting & Markings
All A/S32A-32A tractors are painted Insignia White with top anti-skid coating in dark grey. They carry yellow reflective stripes and a lot of small stenciling that includes warning and service notes. The driver seat is black and the lights are clear red.
5. Reference Data
[1] A small photo walk-around: link (go to Photography => Aircraft Carrier Ops => Flight Deck Equipment Part II).


,_May_1944.jpg)
.jpg)
_move_a_CH-46E_Sea_Knight_helicopter_into_position_on_the_flight_deck.jpg)
.jpg)
_Airman_Michael_Parham_moves_a_CH-46E_Sea_Knight_helicopter_in_the_hangar_bay_of_th.jpg)
_Airman_Darrell_Winston_maneuvers_an_E-2C_Hawkeye_in_the_hangar_bay_aboard_the_aircr.jpg)
.jpg)